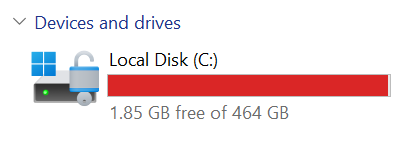
As a Cloud Engineer you may find yourself constantly using WSL (Windows Subsystem for Linux). The challenge is though it becomes very important to free up space on your drive C, often used for installing WSL as valuable storage is quickly consumed, especially when working with resource-intensive projects involving Kubernetes, Docker, and Terraform. If you are on Windows and you're like me the question of "why am I even using this system to develop cloud solutions" might even cross your mind.
To explain that, many developers running WSL (Windows Subsystem for Linux) often face the challenge of limited space on their C drive. Now you might ask if you're using cloud tools that you shouldn't be using the cloud. I agree to a point; however, there are still a number of advantages to using a windows such as being able to test locally without incurring a heavy bill.
I made the switch years ago from being a full apple guy to a windows machine since that allowed me to use simulation softwares that would be helpful in my then career. While I needed that then as my career shifts towards the cloud I keep finding myself using a workaround for the windows to use the cloud solutions. With that being the case, one thing that keeps getting on my nerves is storage on my Windows device.
In this tutorial, I'll show you how to install Ubuntu (or another Linux distribution) within WSL in a custom directory on a different drive, freeing up space on your C drive.
Problem:
- WSL installs to C drive by default.
- Limited C drive space on your computer.
- Cloud-related projects (Kubernetes, Docker, Terraform) consume significant space.
Solution:
- Install WSL distribution in a custom directory on another drive (e.g., D drive).
Prerequisites:
- Windows Subsystem for Linux enabled.
- PowerShell.
- Administrative privileges.
Method 1: Installing Ubuntu 18.04 in WSL to D drive
Step 1: Create Directory in D Drive
Create a folder where you'll install your distribution.
mkdir D:\Ubuntu1804
cd D:\Ubuntu1804
Step 2: Download Ubuntu Appx File
Download Ubuntu 18.04 appx file using PowerShell.
Invoke-WebRequest -Uri https://cloud-images.ubuntu.com/wsl/bionic/daily/ubuntu-1804-server-wsl.rootfs.tar.gz -OutFile Ubuntu.appx -UseBasicParsingThe above command might not work so you can use the command:
Invoke-WebRequest -Uri https://aka.ms/wslubuntu1804 -OutFile Ubuntu.appx -UseBasicParsingStep 3: Rename and Extract .appx Package
Rename the .appx file to .zip and extract its contents using PowerShell. This step reveals the executable and essential files.
Rename-Item .\Ubuntu.appx Ubuntu.zip
Expand-Archive .\Ubuntu.zip -DestinationPath .\Ubuntu -Verbose
Step 4: Run ubuntu1804.exe or ubuntu.exe
After the command is done the files will automatically expand so go to your file and find the EXE file and run it.
Step 5: Launch and Configure Ubuntu
After Installation create a username and password. Once the setup is complete, a terminal window will appear, requesting you to create a UNIX username and password.
Step 6: Verify Installation
After the version 18 has been created which can be cross checked by checking:
wsl -l -vMethod 2: Manually Install Latest Ubuntu (e.g., 22.04 or 24.04) in a Custom Folder
💡 1. Choose Version and Create Target Folder
Let's say you want Ubuntu 22.04. Create a folder for it:
mkdir D:\Ubuntu2204
cd D:\Ubuntu2204
🌐 2. Download the Ubuntu .appx Installer
Use this in PowerShell to download Ubuntu 22.04:
Invoke-WebRequest -Uri https://aka.ms/wslubuntu2204 -OutFile Ubuntu.appx -UseBasicParsing(Optional): For Ubuntu 24.04 (if available), you’d use:
Invoke-WebRequest -Uri https://aka.ms/wslubuntu2404 -OutFile Ubuntu.appx -UseBasicParsing📦 3. Unpack the Installer
Rename-Item .\Ubuntu.appx Ubuntu.zip
Expand-Archive .\Ubuntu.zip -DestinationPath .\Ubuntu -Verbose
cd Ubuntu
🚀 4. Register the Distro with WSL
Now register it under WSL:
.\ubuntu2204.exe(or .\ubuntu.exe depending on what’s inside the folder)
On first launch, it will ask you to create a UNIX username and password.
💾 5. (Optional) Set as Default Distro
If you want to make this the default distro:
wsl --set-default Ubuntu-22.04(You can check name with wsl -l)
Explanation:
mkdir D:\Ubuntu1804: Creates a directory named "Ubuntu1804" on your D drive.cd D:\Ubuntu1804: Changes the current directory in PowerShell to the newly created folder.Invoke-WebRequest: Downloads the Ubuntu distribution file (appx) from Microsoft's servers. The-UseBasicParsingparameter is added for compatibility.Rename-Item: Renames the downloaded.appxfile to.zip.Expand-Archive: Extracts the contents of the renamed.zipfile into a subfolder..\ubuntu1804.exe: Launch the WSL application and create the user.wsl -l -v: list out the versions for linux and show which of the versions has been created.
Conclusion:
By following these steps, you can effectively manage your disk space and improve the performance of your system while continuing to utilize the benefits of WSL for cloud-related projects. This will ensure that your resources are directed to the correct drivers and you will avoid the errors associated with memory.