In this post, I’m going to walk you through the process of building a simple weather dashboard application using Python. This project involved interacting with a weather API, working with cloud storage (AWS S3), and tackling some common development challenges along the way. It was quite a journey, and I’m excited to share the details with you. The repository can be found at-------------->https://github.com/Nightwalka/weather-app.git
Project Overview
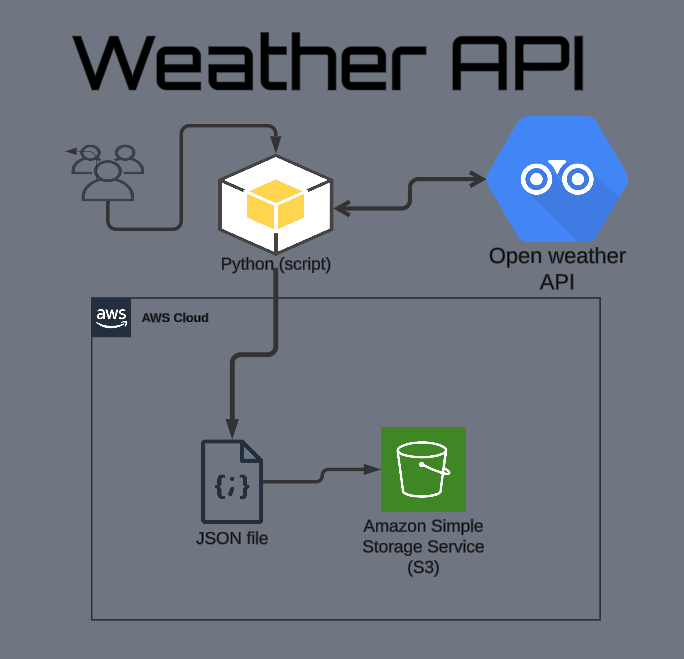
The goal of this project was to create a command-line application that:
- Fetches current weather data for multiple cities using the OpenWeatherMap API.
- Saves this data as JSON files in an AWS S3 bucket.
This project serves as a good example of how to use Python for data retrieval, API interaction, cloud service integration, and basic programming concepts.
Step 1: Project Setup and Structure
The first thing I did was to set up the project structure. This involved creating a root folder named get-your-job and a subfolder within it named weather-dashboard. I also structured this project using
a standard pattern, so the file structure looked like this:
get-your-job/
    weather-dashboard/
        data/          # To store any local data files (not used in final version)
        src/           # To store the Python source code
        test/          # To store any test scripts (not used in final version)
        .env            # To store sensitive information
        README.md        # Documentation for the project
        requirements.txt # Listing the libraries this project uses.
I created an empty data directory which could be used to save local files, and an empty test directory which could be used to save python test files for this project.
The .env file would be used to store environment variables like API keys and bucket names. The README.md would contain documentation for the project, and requirements.txt would contain all
of the libraries to be used for this project.
Step 2: Setting up the .gitignore and requirements.txt Files
Next, I created the .gitignore and requirements.txt files. The .gitignore would prevent files such as the .env file from accidentally being committed to Git. To start, I used
the echo command to add .env, __pycache__/ and *.zip to my .gitignore file:
echo ".env" >> .gitignore
echo "__pycache__/" >> .gitignore
echo "*.zip" >> .gitignore
This ensures the .env file containing private keys, Python's generated cache files, and any zip files are not committed to the repository.
Then I added the specific libraries that would be needed for this project to requirements.txt by using the echo command:
echo "boto3==1.26.137" >> requirements.txt
echo "python-dotenv==1.0.0" >> requirements.txt
echo "requests==2.28.2" >> requirements.txt
This file contains the names and the specific versions of all required Python libraries needed for the project, to ensure consistency when this project is run on different systems.
Step 3: Installing Dependencies
With the requirements.txt file created, I used pip to install all of the libraries listed:
pip install -r requirements.txt
This command downloads and installs the required libraries into my python environment. It was at this stage that I started to encounter my first challenge.
Step 4: Initial Coding and First Major Challenge: ModuleNotFoundError
I began writing the Python code for the application in the src/weather_dashboard.py file and attempted to run the code using the command:
python src/weather_dashboard.py
However, I immediately encountered a ModuleNotFoundError: No module named 'heapq' error. This was strange, as `heapq` is part of Python's standard library and should be available by default.
The Troubleshooting Journey:
- Initial Analysis: I verified my Python version using
python --version, which confirmed I was using Python 3.8.0. - Minimal Test Script: I created a minimal test script to check if `heapq` could be imported directly. This test also failed, confirming the problem was not with my specific python code, but with the python environment I was using.
- Python Installation Issue: The repeated failures indicated that my Python installation was corrupted. I uninstalled my current python 3.8 installation, and reinstalled it. However, this did not fix the problem.
At this point it was becoming clear I had more than one installation of python on my computer, and I was not always certain which one was being used.
Step 5: Environment Confusion and Multiple Python Versions
After reinstalling python 3.8, the heapq error persisted, and I found that the python libraries were now being installed into my python 3.9.0 installation at c:\users\legion\appdata\local\programs\python\python39\lib\site-packages.
This was happening even when I was running the pip command from the python 3.8 environment, which indicated that pip was using the incorrect python installation.
The Troubleshooting Journey:
- VS Code Investigation: I investigated the VS code environment and discovered VS code was using the python 3.8 environment, while the command line was calling python 3.9.
- Trying Different Versions of Python: I tried calling different versions of python using various commands such as
python3,python3.8and an explicit path, all while receiving different errors. - Multiple Python Installations: It was clear that there were multiple versions of Python on my system. I attempted to use the same installation in both the command prompt and in VS code, however, this did not fix the issue.
Step 6: Deleting All Other Python Installations
After hours of attempting to debug these environment issues, I made the decision to completely uninstall all python installations on my computer, except for python 3.9. This would ensure that there was only one python version present, and therefore any issues would not be related to the presence of multiple versions.
After deleting the other python versions, I was then able to configure VS Code to use the python 3.9 interpreter, and use the command line python interpreter for python 3.9. At this point the output of python --version and pip --version matched, as well as python3 --version and pip3 --version.
This step alone did not completely fix the problem, as the python libraries were still not found, but it was necessary to proceed to the next step.
Step 7: Introduction to Virtual Environments
At this point, VS Code suggested I use a virtual environment, to isolate my dependencies from the global environment. This is the standard way of managing python environments, so I followed this advice, and learned about this concept. I used the following commands:
python -m venv .venv
Then I activated the virtual environment:
.venv\Scripts\activate
This created an isolated environment for my project's dependencies. It was at this point that I understood that I would need to install my libraries again, as they are not installed in this new virtual environment. I installed them using the command:
pip install -r requirements.txt
Unfortunately, this command did not work in this shell, as I was not using a source command.
Step 8: Correct Path Issues and Syntax Issues
After creating the virtual environment, I was then faced with errors that were related to my use of the wrong path syntax. Specifically I was trying to use:
.venv\Scripts\activate
instead of the correct bash syntax for activating a virtual environment which is:
source .venv/Scripts/activate
I also had an error related to how I was calling my python scripts. I was trying to specify the entire path of python with the filename C:\Users\LEGION\AppData\Local\Programs\Python\Python39\python.exe src/weather_dashboard.py.
Instead I learned that I must simply call the script using either the python or the python3 command and specify the relative path to my python file, such as:
python src/weather_dashboard.py
or
python3 src/weather_dashboard.py
Step 9: Resolving the S3 Bucket Creation Error and API Key Issues
Finally, with the environmental issues out of the way, I ran my script, and was finally able to create the S3 bucket. However, when attempting to get data from the open weather API, I was then faced with a new issue related to a 401 Unauthorized error. I also received an error related to creating a bucket: IllegalLocationConstraintException.
The Troubleshooting Journey:
- API Key Problem: The 401 error meant that I had not properly set up the
OPENWEATHER_API_KEYenvironment variable. To fix this I had to set the environment variable in my.envfile as a key value pair like so:OPENWEATHER_API_KEY=your_api_key_hereyour_api_key_heremust be replaced with the actual API key. - S3 Bucket Issue: The
IllegalLocationConstraintExceptionmeant I was attempting to create an S3 bucket using a default region that was not specified by my AWS cli installation. To fix this I had to specify the region by making a small modification to myweather_dashboard.pyfile in thecreate_bucket_if_not_existsfunction, by adding a `LocationConstraint` parameter to the `create_bucket` command:self.s3_client.create_bucket( Bucket=self.bucket_name, CreateBucketConfiguration={'LocationConstraint': 'ap-south-1'} # Replace with your AWS CLI region if needed )ap-south-1was my default region, which you can check by using the commandaws configure.
Step 10: Handling an Indentation Error
After fixing the above errors, I was then faced with a new IndentationError: unexpected indent. This was caused by an error when copying and pasting the code from the previous step. To fix this, I simply had to re-align
the code inside of that code block.
The Completed Application
After addressing all these issues, I was finally able to run the application successfully!
import os
import json
import boto3
import requests
from datetime import datetime
from dotenv import load_dotenv
# Load environment variables
load_dotenv()
class WeatherDashboard:
def __init__(self):
self.api_key = os.getenv('OPENWEATHER_API_KEY')
self.bucket_name = os.getenv('AWS_BUCKET_NAME')
self.s3_client = boto3.client('s3')
def create_bucket_if_not_exists(self):
"""Create S3 bucket if it doesn't exist"""
try:
self.s3_client.head_bucket(Bucket=self.bucket_name)
print(f"Bucket {self.bucket_name} exists")
except:
print(f"Creating bucket {self.bucket_name}")
try:
# Simpler creation for us-east-1
self.s3_client.create_bucket(
    Bucket=self.bucket_name,
    CreateBucketConfiguration={'LocationConstraint': 'ap-south-1'} # Replace with your AWS CLI region if needed
)
print(f"Successfully created bucket {self.bucket_name}")
except Exception as e:
print(f"Error creating bucket: {e}")
def fetch_weather(self, city):
"""Fetch weather data from OpenWeather API"""
base_url = "http://api.openweathermap.org/data/2.5/weather"
params = {
"q": city,
"appid": self.api_key,
"units": "imperial"
}
try:
response = requests.get(base_url, params=params)
response.raise_for_status()
return response.json()
except requests.exceptions.RequestException as e:
print(f"Error fetching weather data: {e}")
return None
def save_to_s3(self, weather_data, city):
"""Save weather data to S3 bucket"""
if not weather_data:
return False
timestamp = datetime.now().strftime('%Y%m%d-%H%M%S')
file_name = f"weather-data/{city}-{timestamp}.json"
try:
weather_data['timestamp'] = timestamp
self.s3_client.put_object(
Bucket=self.bucket_name,
Key=file_name,
Body=json.dumps(weather_data),
ContentType='application/json'
)
print(f"Successfully saved data for {city} to S3")
return True
except Exception as e:
print(f"Error saving to S3: {e}")
return False
def main():
dashboard = WeatherDashboard()
# Create bucket if needed
dashboard.create_bucket_if_not_exists()
cities = ["Philadelphia", "Seattle", "New York"]
for city in cities:
print(f"\nFetching weather for {city}...")
weather_data = dashboard.fetch_weather(city)
if weather_data:
temp = weather_data['main']['temp']
feels_like = weather_data['main']['feels_like']
humidity = weather_data['main']['humidity']
description = weather_data['weather'][0]['description']
print(f"Temperature: {temp}°F")
print(f"Feels like: {feels_like}°F")
print(f"Humidity: {humidity}%")
print(f"Conditions: {description}")
# Save to S3
success = dashboard.save_to_s3(weather_data, city)
if success:
print(f"Weather data for {city} saved to S3!")
else:
print(f"Failed to fetch weather data for {city}")
if __name__ == "__main__":
main()
Now when I run the code, it creates the S3 bucket (if it doesn’t already exist), fetches the weather data for the specified cities, prints the weather information, and saves the weather data to S3.
Conclusion
This project was a fantastic experience that covered a lot of ground. I not only got to build a useful application, but I also learned a lot about Python environments, how to call third-party APIs, and how to use AWS S3. It was a challenging process but solving every issue was rewarding, and I hope you found this detailed documentation useful!