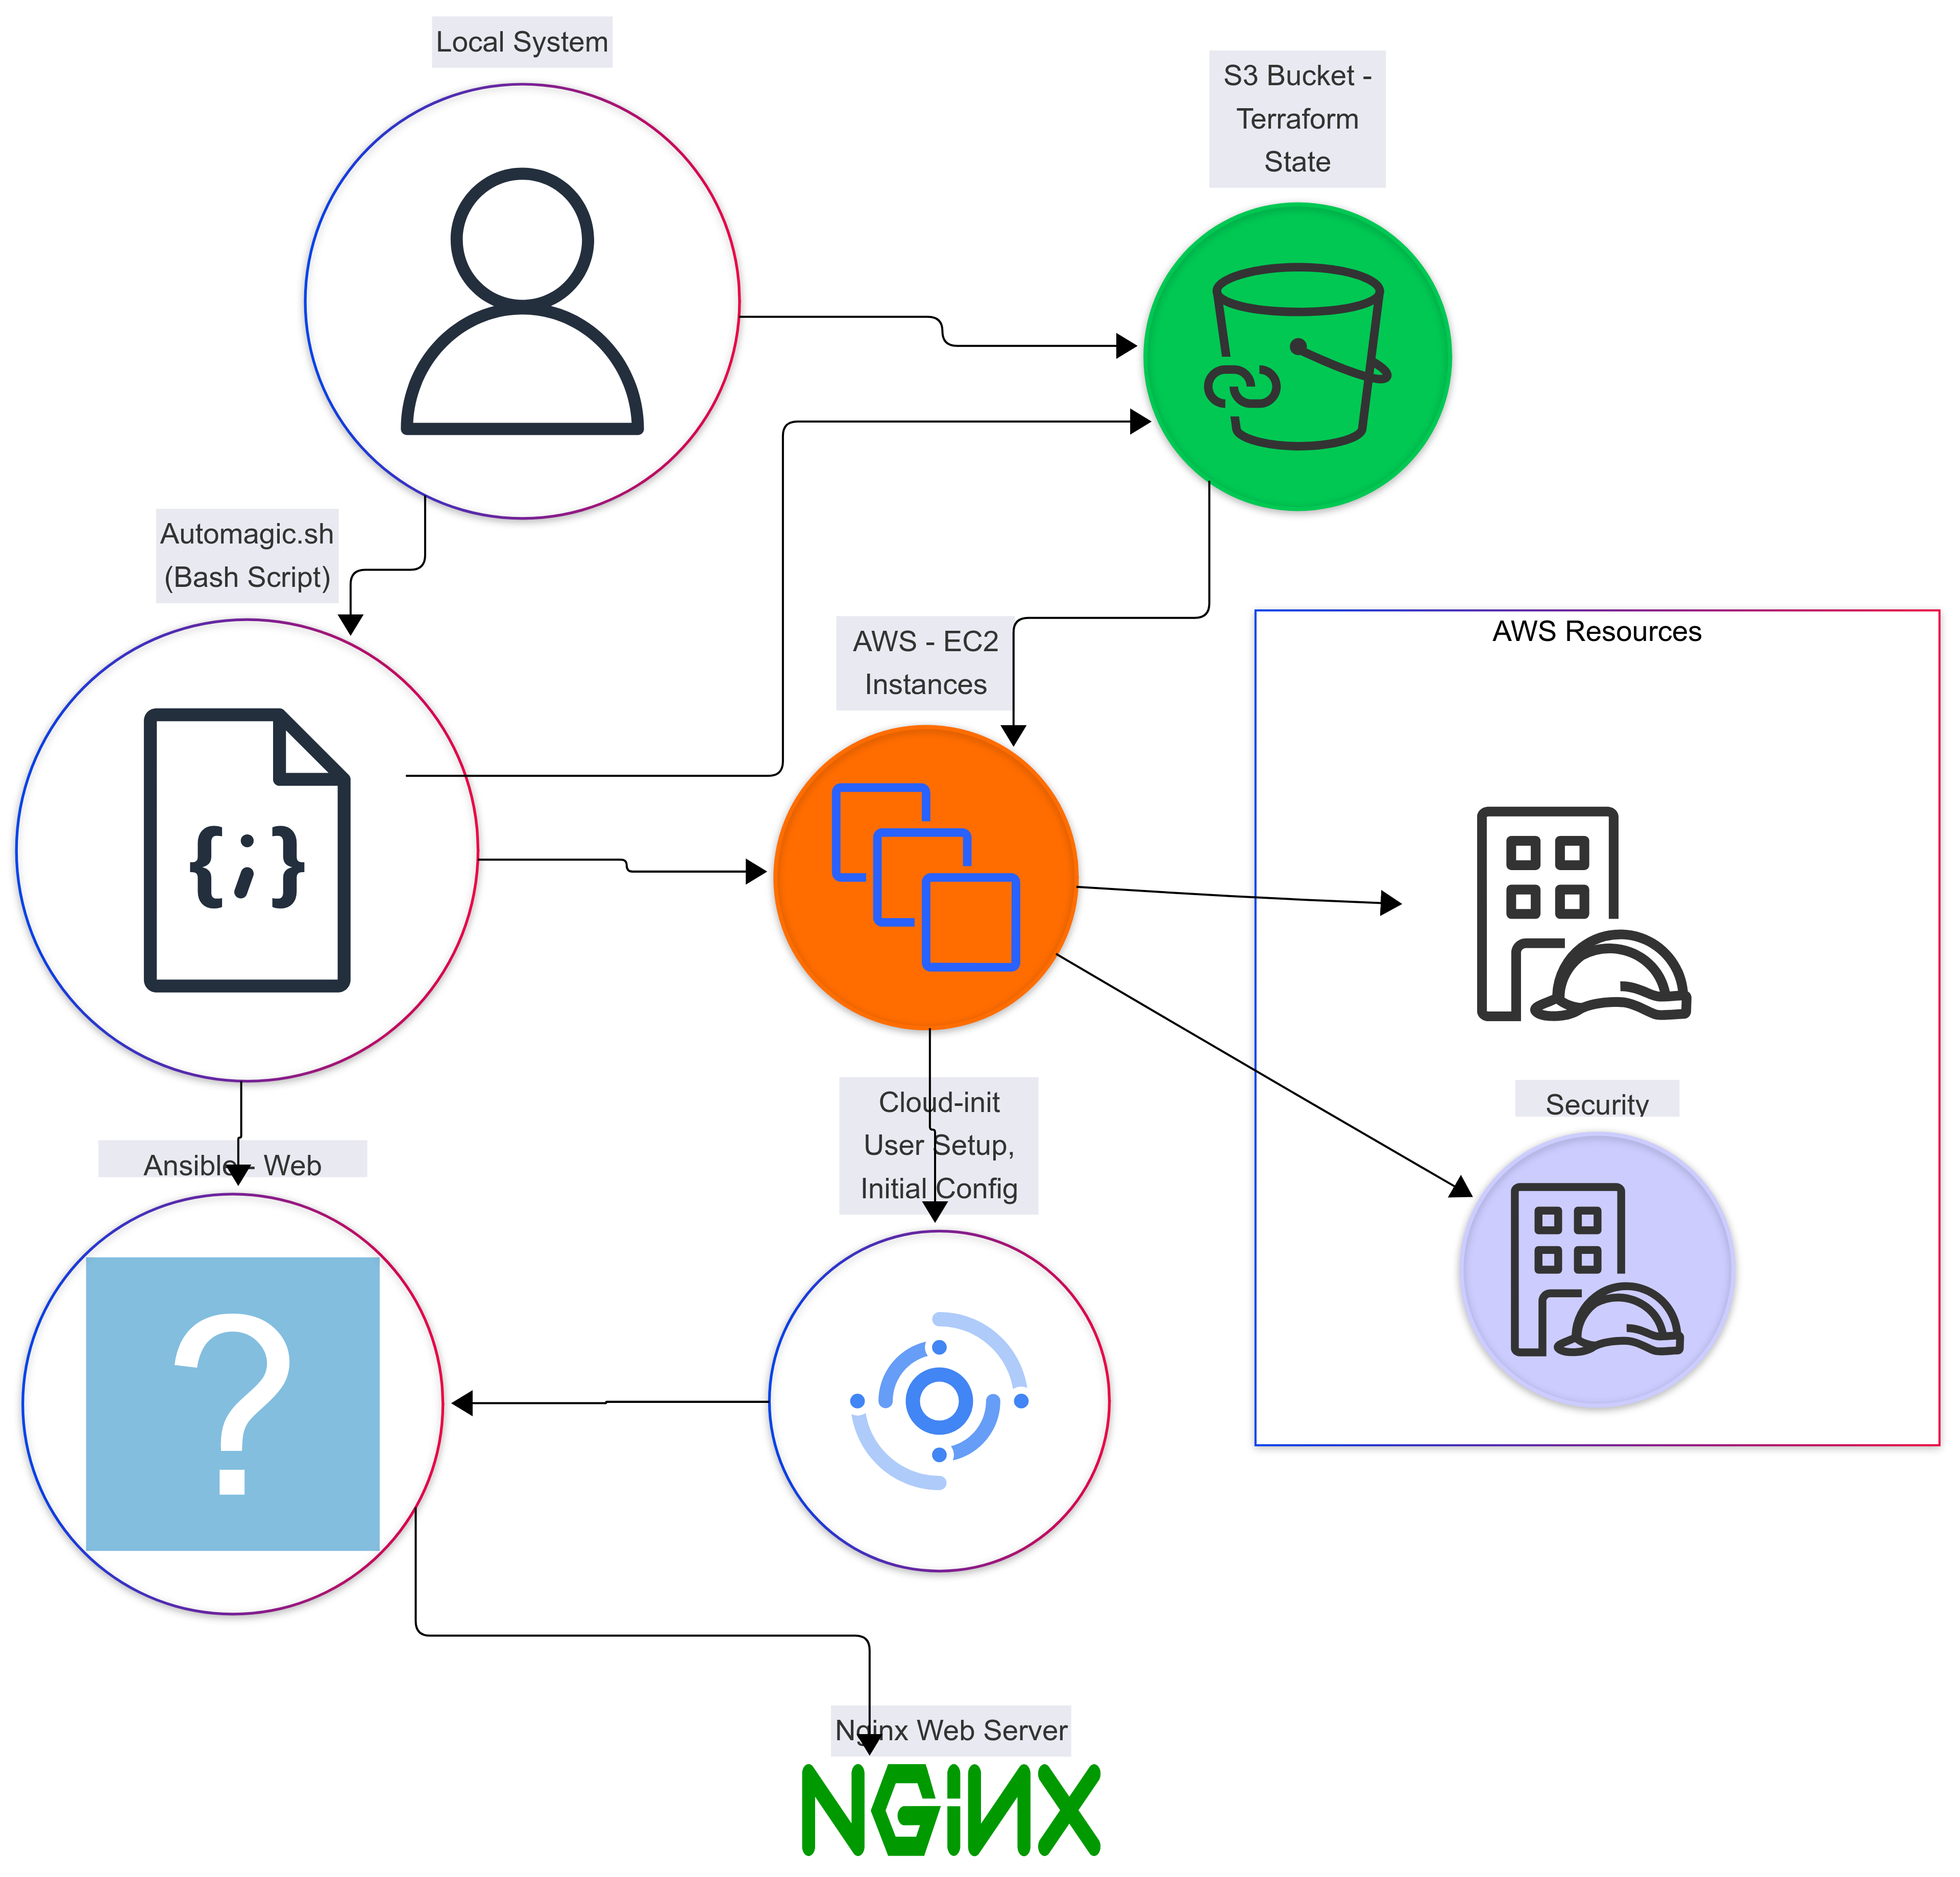
Welcome! If you're new to cloud computing, infrastructure as code, or automation, you're in the right place. In this guide, we'll walk through building a simple, yet powerful, cloud infrastructure on Amazon Web Services (AWS) using Terraform, Ansible, and a little bit of Bash scripting. Don't worry if you're not familiar with all these terms yet. We'll explain everything step-by-step, focusing on why we're doing each thing, so you can build a solid foundation for your cloud journey.
Think of this project as your "Hello, World!" for the cloud. We'll be setting up:
- An S3 bucket: Your own cloud storage space to keep track of your "infrastructure code."
- Two virtual servers (EC2 instances): Think of these as your own computers in the cloud where you'll run your websites.
- Automatic website setup: We'll use automation to install the software needed to run a simple game on those servers.
The Players: A Quick Introduction
Before we dive in, let's meet the technologies we'll be using:
- AWS (Amazon Web Services): The massive cloud platform where we'll build our infrastructure. It provides all the services we need, from storage to servers.
- Terraform: An "infrastructure as code" (IaC) tool. Instead of clicking around in the AWS console, we'll write code that describes what we want, and Terraform will make it happen. This is like having a blueprint for your cloud!
- Ansible: An automation tool that will configure our servers after they've been created by Terraform. Think of it as the construction crew that sets up everything inside the house after it's built.
- Bash: A scripting language we'll use to tie everything together. It's like a project manager that tells Terraform and Ansible when to do what.
Section 1: Laying the Groundwork: Setting up the S3 Bucket
First, we need to set up a special place on AWS to store Terraform's "state file." This file is like a map that tells Terraform what infrastructure it has already created. Storing it remotely in an S3 bucket (AWS's cloud storage service) is best practice for a few reasons:
- Collaboration: It allows multiple people to work on the same infrastructure.
- Version Control: It enables you to track changes to your infrastructure over time.
- Security: It provides a secure place to store your state file.
Here's how to set up the S3 bucket:
- Open Your Text Editor: Choose your favorite text editor (like VS Code, Sublime Text, Notepad++, etc.).
- Create a Directory: Create a new folder called
bucketto store the files related to the S3 bucket. - Create
main.tf: Inside thebucketfolder, create a file namedmain.tf. This is where we'll write the Terraform code to create the S3 bucket. - Paste This Code: Copy and paste the following code into
main.tf:
terraform {
  required_providers {
    aws = {
      source  = "hashicorp/aws"
      version = "5.01"
    }
  }
  required_version = ">= 1.4.6"
}

module "s3_bucket" {
  source = "terraform-aws-modules/s3-bucket/aws"
  version = "3.14.0"
  bucket = "YOUR-UNIQUE-BUCKET-NAME" # REPLACE ME!
  acl    = "private"
  force_destroy = true

  control_object_ownership = true
  object_ownership         = "ObjectWriter"

  versioning = {
    enabled = true
  }
}
Important! Change "YOUR-UNIQUE-BUCKET-NAME" to something that you choose. This name needs to be unique across all of AWS, so using your name or organization name is a good start. Also, bucket names
must be lowercase and cannot contain spaces.
Let's break down what this code does:
-
terraform { ... }: This section tells Terraform which providers (like AWS) and versions we need. It's like declaring the ingredients for our cloud recipe. -
module "s3_bucket" { ... }: This is where we use a pre-built "module" to create the S3 bucket. Modules are like reusable components that simplify complex tasks. In this case, we're using a module from the Terraform Registry (a public library of modules). -
source = "terraform-aws-modules/s3-bucket/aws": This tells Terraform where to find the S3 bucket module. -
bucket = "YOUR-UNIQUE-BUCKET-NAME": This sets the name of the bucket. You need to replace this with your own unique name! -
acl = "private": This sets the "access control list" (ACL) toprivate, meaning only you (or users you explicitly grant access to) can access the bucket. This is important for security. -
force_destroy = true": This setting allows Terraform to delete the bucket even if it contains files. This is useful for cleaning up resources, but be careful! -
versioning = { enabled = true }: This setting enables versioning on the S3 bucket, which means that every time a file is updated in the bucket, the previous version is saved. This is a good practice for data protection.
- Open Your Terminal: Navigate to the
bucketdirectory in your terminal. - Initialize Terraform: Run the command
terraform init. This command initializes the Terraform working directory, downloads the necessary plugins, and prepares Terraform to create your infrastructure. - Apply the Configuration: Run the command
terraform apply -auto-approve. This command tells Terraform to create the S3 bucket according to the code inmain.tf. The-auto-approveflag automatically approves the changes, so you don't have to type "yes."
Congratulations! You've just created your first piece of cloud infrastructure! Head over to the AWS console, navigate to the S3 service, and you should see your new bucket.
Section 2: Building the Foundation: EC2 Instances and IAM
Now that we have a place to store our Terraform state, let's build the actual infrastructure: two virtual servers (EC2 instances) and the necessary security rules and access permissions (IAM). We'll be creating several files within
a new directory called
instances.
Here's the plan:
- Create the
instancesDirectory: Create a new folder namedinstancesin your project. -
Create Several
.tfFiles: Inside theinstancesdirectory, create the following files:providers.tf: To configure the AWS provider.variables.tf: To define variables for instance type and SSH key.sg.tf: To define security groups (firewall rules) for the instances.aws-instances.tf: To define the EC2 instances themselves.key_deployer.tf: To set up the SSH keys.outputs.tf: To display useful information after the infrastructure is created.version.tf: To use the S3 bucket as backend.
- Fill in the Files: Copy and paste the following code into each file.
1. instances/providers.tf:
provider "aws" {
  region = "us-east-2" # Ohio
}

provider "aws" {
  alias  = "virginia"
  region = "us-east-1" # N. Virginia
}
This tells Terraform which AWS regions to use. We're deploying one instance in Ohio (us-east-2) and another in Northern Virginia (us-east-1). The alias allows us to specify a different region
for a specific resource.
2. instances/variables.tf:
variable "instance_type" {
  description = "AWS EC2 Instance Type"
  default     = "t2.micro"
}

variable "ssh_key" {
  description = "SSH Key for Instances and Virtual Machines"
  default     = "ssh_key"
}
These variables let us customize the instance type (the size of the virtual server) and the SSH key used to access it. The default values provide a starting point.
3. instances/sg.tf:
locals {
  inbound_ports  = [22, 80, 443]
  outbound_ports = [22, 80, 443, 1433]
}

resource "aws_security_group" "sg_webserver_ohio" {
  name        = "webserver-sg-ohio"
  description = "Security Group Ports for Web Servers"

  dynamic "ingress" {
    for_each = local.inbound_ports
    content {
      from_port   = ingress.value
      to_port     = ingress.value
      protocol    = "tcp"
      cidr_blocks = ["0.0.0.0/0"]
    }
  }

  dynamic "egress" {
    for_each = local.outbound_ports
    content {
      from_port   = egress.value
      to_port     = egress.value
      protocol    = "tcp"
      cidr_blocks = ["0.0.0.0/0"]
    }
  }
}

resource "aws_security_group" "sg_webserver_virginia" {
  provider    = aws.virginia
  name        = "webserver-sg-virgina"
  description = "Security Group Ports for Web Servers"

  dynamic "ingress" {
    for_each = local.inbound_ports
    content {
      from_port   = ingress.value
      to_port     = ingress.value
      protocol    = "tcp"
      cidr_blocks = ["0.0.0.0/0"]
    }
  }

  dynamic "egress" {
    for_each = local.outbound_ports
    content {
      from_port   = egress.value
      to_port     = egress.value
      protocol    = "tcp"
      cidr_blocks = ["0.0.0.0/0"]
    }
  }
}
This code creates "security groups," which act like virtual firewalls for our EC2 instances. It opens the following ports:
- 22 (SSH): To allow us to connect to the instances remotely using SSH.
- 80 (HTTP): To allow web traffic to reach our website.
- 443 (HTTPS): To allow secure web traffic to reach our website.
Important: The cidr_blocks = ["0.0.0.0/0"] line allows traffic from anywhere on the internet. For a production environment, you'd want to restrict this to specific IP addresses.
You will need to create your own security groups.
4. instances/aws-instances.tf:
resource "aws_instance" "web_server_1" {
  ami                    = "ami-097a2df4ac947655f"  # Ohio
  instance_type          = var.instance_type
  key_name               = var.ssh_key
  vpc_security_group_ids = [aws_security_group.sg_webserver_ohio.id]
  user_data              = file("../scripts/hulk.yaml")
  tags = {
    Name         = "Web-Server-1"
    time_created = formatdate("MM DD YYYY hh:mm ZZZ", timestamp())
    department   = "Techie-Nerds"
    ID           = "ID-${random_id.instance_id_1.hex}"
  }
}

resource "aws_instance" "web_server_2" {
  provider               = aws.virginia
  ami                    = "ami-053b0d53c279acc90"  # N. Virginia
  instance_type          = var.instance_type
  key_name               = var.ssh_key
  vpc_security_group_ids = [aws_security_group.sg_webserver_virginia.id]
  user_data              = file("../scripts/hulk.yaml")
  tags = {
    Name         = "Web-Server-2"
    time_created = formatdate("MM DD YYYY hh:mm ZZZ", timestamp())
    department   = "Techie-Nerds"
    ID           = "ID-${random_id.instance_id_2.hex}"
  }
}

resource "random_id" "instance_id_1" {
  byte_length = 16
}

resource "random_id" "instance_id_2" {
  byte_length = 16
}
This is where we define the EC2 instances themselves!
-
ami: This specifies the Amazon Machine Image (AMI), which is a template for the operating system and software installed on the instance. It's critical to choose the correct AMI for your region. The AMIs provided are for Ubuntu 22.04. -
instance_type: This sets the size and resources of the instance.t2.microis a small, inexpensive instance suitable for testing. -
key_name: This specifies the SSH key to use for accessing the instance. We'll set this up in the next step. -
vpc_security_group_ids: This associates the instance with the security groups we created earlier, controlling network access. -
user_data: This is a script that runs when the instance is first launched. We'll use this to set up the user and install some basic software. We'll create a user account. -
tags: These are labels that can be added to the instance. This lets us identify and manage the instance.
5. instances/key_deployer.tf:
resource "aws_key_pair" "deployer_ohio" {
  key_name   = "ssh_key"
  public_key = "REPLACE_WITH_YOUR_PUBLIC_KEY"
}

resource "aws_key_pair" "deployer_virginia" {
  provider = aws.virginia
  key_name   = "ssh_key"
  public_key = "REPLACE_WITH_YOUR_PUBLIC_KEY"
}
This is where we tell AWS about our SSH key.
-
key_name: This sets the name of the SSH key. We're using "ssh_key" here, but you can choose a different name. -
public_key: This is where you need to paste the *public* key from your SSH key pair.
Important: Generating Your Own SSH Key Pair
You should NEVER include your private keys in the code.
- Open your terminal (on Linux or macOS) or use a tool like PuTTYgen on Windows.
- Generate a new SSH key pair using the following command:
ssh-keygen -t rsa -b 2048 -f ./keys/ssh_key
Press Enter to accept the default file location (./keys/ssh_key) and leave the passphrase empty.
- This will create two files in the keys directory:
ssh_key(your private key) andssh_key.pub(your public key).
6. instances/outputs.tf:
output "public_dns_server_1" {
  description = "DNS name of the First EC2 instance"
  value       = aws_instance.web_server_1.public_dns
}

output "public_ip_server_1" {
  description = "Public IP address of the First EC2 instance"
  value       = aws_instance.web_server_1.public_ip
}

output "private_ip_server_1" {
  description = "Private IP address of the First EC2 instance"
  value       = aws_instance.web_server_1.private_ip
}

output "web_server_1_id" {
  description = "ID of the First EC2 instance"
  value       = aws_instance.web_server_1.tags.ID
}

output "public_dns_server_2" {
  description = "DNS name of the Second EC2 instance"
  value       = aws_instance.web_server_2.public_dns
}

output "public_ip_server_2" {
  description = "Public IP address of the Second EC2 instance"
  value       = aws_instance.web_server_2.public_ip
}

output "private_ip_server_2" {
  description = "Private IP address of the Second EC2 instance"
  value       = aws_instance.web_server_2.private_ip
}

output "web_server_2_id" {
  description = "ID of the Second EC2 instance"
  value       = aws_instance.web_server_2.tags.ID
}
This code defines what information Terraform will display after it creates the infrastructure. We're outputting the public IP addresses of the instances so we can access them.
7. instances/version.tf:
terraform {
  backend "s3" {
    bucket = "YOUR-UNIQUE-BUCKET-NAME" # Replace with your bucket name
    key    = "dir1/terraform.tfstate"
    region = "us-east-1" # The region where your bucket is.
  }
  required_providers {
    aws = {
      source  = "hashicorp/aws"
      version = "5.01"
    }
    azurerm = {
      source  = "hashicorp/azurerm"
      version = "=3.0.0"
    }
  }

  required_version = ">= 1.4.6"
}
Important: Replace "YOUR-UNIQUE-BUCKET-NAME" with the same unique S3 bucket name you chose earlier!
The backend code connects the state to the S3 bucket we have already created.
Section 3: Setting Up Initial Server Configuration with Cloud-init
Create a directory named scripts with the file hulk.yaml.
The following users will be created:
- Default ubuntu user
hulkuser
Create a file named hulk.yaml with the following code:
#cloud-config-mkdocs-system

groups:
  - ubuntu: [root,sys]
  - ansible-group

users:
  - default
  - name: hulk
    gecos: Dr. Banner
    shell: /bin/bash
    primary_group: ansible-group
    sudo: ALL=(ALL) NOPASSWD:ALL
    groups: users, admin
    lock_passwd: false
    ssh_authorized_keys:
    # Enter your key here:
    - REPLACE_WITH_YOUR_PUBLIC_KEY

runcmd:
  - touch /home/hulk/hello.txt
  - echo "HULK SMASH WHEN DONE!!" >> /home/hulk/hello.txt
  - mkdir asteroids
  - sudo apt update
Important: Replace "REPLACE_WITH_YOUR_PUBLIC_KEY" with the same public key you used in instances/key_deployer.tf.
This cloud-init script does the following:
user: The new user account that will be created.runcmd: Theruncmdsets up the necessary files and directory.
We now copy everything inside the main terraform console
Section 4: Tying Everything Together with the AutoMagic Script
Open create the AutoMagic bash script in the main directory
#!/bin/bash

## IMPORTANT! This lab is designed to run on a Linux system, or one with access to a Bash terminal.
## You will need Ansible installed on the local system for the lab to work properly.

start=$SECONDS

terraform -chdir=bucket init
terraform -chdir=bucket apply -auto-approve

printf "\n\033[7;31mWAITING 5 SECONDS FOR BUCKET TO INITIALIZE......\033[0m\n\n"
sleep 5

printf "\n\033[7;31mS3 BUCKET CREATED!!!......\033[0m\n\n"

terraform -chdir=instances init
terraform -chdir=instances apply -auto-approve

export ANSIBLE_CONFIG=ansible/ansible.cfg

: > ansible/inventory
echo "[nginx]" > ansible/inventory
echo $(terraform -chdir=instances output -raw public_ip_server_1) >> ansible/inventory
echo $(terraform -chdir=instances output -raw public_ip_server_2) >> ansible/inventory

sleep 3

echo
echo

printf "\n\033[7;31mWAITING 10 SECONDS FOR SYSTEMS TO INITIALIZE - PING CHECK......\033[0m\n\n"
sleep 10

ansible all --private-key  ~/new_ssh_key -i ansible/inventory -u hulk -m ping

printf "\n\033[7;31mWAITING 10 SECONDS BEFORE RUNNING THE PLAYBOOK......\033[0m\n\n"
sleep 10

ansible-playbook ansible/playbook.yml --private-key  ~/new_ssh_key -i ansible/inventory -u hulk

printf "\n\033[7;32mPROCESS COMPLETE! \033[0m"
echo
printf "\nTime to complete = %s seconds" "$SECONDS"
echo

## END
Remember! We need to edit this file so it correctly leads to the ssh keys that we have generated.
5. Make the script executable chmod +x automagic.sh
Section 6: Run the infrastructure
- Let the script rock!
- Open the Main Directory
- Enter the command:
./automagic.sh
Congratulations, we just set up our environment
Section 7: CLEAN UP! - Auto Destroy Script!
Enter create autodestroy.sh file in the main project directory
#!/bin/bash

terraform -chdir=instances destroy -auto-approve
terraform -chdir=bucket destroy -auto-approve
Now you should be good.
You can now implement this, code is on my github: https://github.com/Nightwalka/Terraform-applied-project-.git